

We recently partnered with Upcycled by Katie to take an old, dated piece of furniture from the Habitat ReStore and transform it into a stunning showstopper.
Keep reading for step-by-step instructions for how to take on a project like this yourself!
Step 1: Take a before photo!
You’re about refinish an old piece of furniture so make sure to take a before photo so you can reflect back and admire all your hard work!!
.gif?width=770&name=Upcycled-by-Katie-Before-(770x770).gif)
Step 2: Remove the doors and shelving.
Step 3: Vacuum!
Furniture collects a lot dust, dirt and other miscellaneous debris over the years so give it a clean with a vacuum.
Step 4: Clean with a strong degreaser.
TSP or a TSP alternative is what I use to clean my pieces. Just like furniture collects a lot of dirt - body oils/fingerprints and grease builds up and will resist your paint.
You want your hard work to last so this is a crucial step to ensure a lasting finish.
.gif?width=770&name=Upcycled-by-Katie-Cleaning-(770x540).gif)
Step 5: Remove the trim on the top of this piece to simplify the top and make it a more versatile piece.
I had to pry the wood trim pieces off and it did damage the surface.
Step 6: Fill dents and scratches with wood filler.
In this case I used bondo (body filler) to fill the large deep damage from removing the trim.
.gif?width=770&name=Upcycled-by-Katie-Filler-(770x540).gif)
Step 7: Sand
Sand the wood filler smooth and give the entire piece a sanding with 180-220grit sandpaper. This is going to help prep the surface for paint.
.gif?width=770&name=Upcycled-by-Katie-Sanding-(770x540).gif)
Step 8: Clean
Wipe down and remove all the residual sanding dust that was left behind.
Step 9: Prime
I ussed BIN shellac based primer and applied with a foam roller all over my piece.
This will give the surface an even finish and prevent bleed through of any wood tannins from coming through your paint (especially with light colours).
This will also highlight any spots that you may have missed with wood filler.
.gif?width=770&name=Upcycled-by-Katie-Primer-(770x540).gif)
Step 10: Do touch-ups
Do wood filler touch-ups and sanded smooth again.
Step 11: Prime again
Always end with a coat of primer after you use wood filler to seal the wood filler before painting
Step 12: Paint!
I used Melange Paint in the colour “Restoration Bronze” and applied it with my favourite brush and roller.
This paint is a high quality furniture paint and has a topcoat built into it.
13. Remove old legs and attach new legs.
One of the old legs was missing the brass cap so I went ahead and ordered new, more updated legs.
Step 14: Spray hardware.
I sprayed the original hardware with champagne gold spray paint and reattached them to the doors.
Step 15: Reassemble
Put the shelves back in and the doors back on.
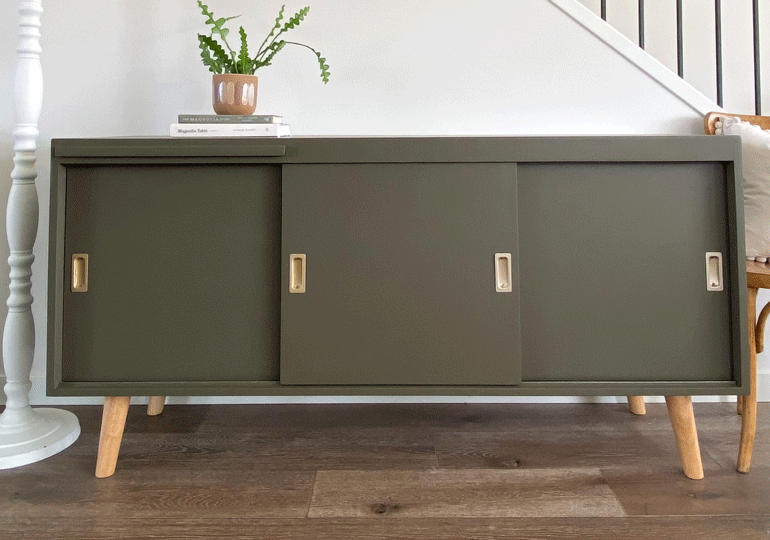
Step 16: Take an after photo and enjoy!
Follow Upcycled by Katie on Instagram to see more spectacular furniture makeovers!
.gif?width=770&name=Upcycled-by-Katie-After-(770x540).gif)
Ready to take on your own DIY project? Visit a Habitat ReStore near you today!
